- types of groups
- selecting modules for a group
- using the Group Editor
- editing input and output ports
- creating a group control panel
- creating an application
Overview
In a remarkably short time, maps tend to overflow the available space,
even with micro control panels. To reduce the clutter and simplify the map,
you can cluster related modules together under a single control panel, called
a
group. A group is an encapsulated collection of modules with its own
group control panel.
When you have an elaborate map containing several opened control panels,
it is possible to misplace some of them: they become hidden behind one
another or behind other windows on the screen. To minimize the visual
complexity of a map, you can group several related modules under one control
panel, creating a more manageable network of modules. Even with a smaller
number of modules, you will probably have more accessible controls than you
really need for a specific map.
Frequently, the creator of a map is not the end user but is producing the
map or application for a group of co-workers or customers. Such a map is
created for a specific purpose, and many of the module parameters available
to the map developer will not be needed by the end user. The developer can
group modules in the Group Editor to reveal only those parameters relevant to
the application at hand. This restricts the functionality of the map, but
also streamlines its user interface.
You can use the Group Editor to promote specific widgets and their ports
from individual modules to the group control panel. When you have placed the
widgets on the group control panel, you can edit them using the Control Panel
Editor, which runs from inside the Group Editor. Once you have established
the group, those parameters from the original set of modules that are not
connected to the group control panel cannot be changed without opening the
group.
A group is a collection of modules that serve a common purpose, sharing a
single control panel and having some of the parameters of the constituent
modules raised to the group level. From the viewpoint of the operating
system, the constituent modules are still separate processes: from the user's
point of view, however, they behave as a single entity.
You create groups of modules that are frequently used in combination, or
that together form a unit of computation. For example, you might want to
create a map that processes an image using four different parameters, each of
which resides in a different module. When you wire all the modules into the
map, you get the parameters you want as well as several others you don't
need.
In this case, you can simplify the map by creating a group for the four
image-processing modules. This reduces the apparent number of modules, and
thus wires, on screen, as well as reducing the number of control panels and
widgets.
Groups have two forms,
open
and
closed:
A group can contain several modules, and it can also contain other groups.
You can therefore create a nested hierarchy of modules under a single control
panel.
You must select each module before you can include it in a group.
To select several modules easily at one time, use the
lasso
technique: click the left mouse in the Map Editor background and sweep it
around the modules; otherwise, hold down the
<
Shift>
key and select individual modules one by one.
The selected modules are saved in the group with the exact relative
placement they had when you selected them. It is a good idea to arrange
modules in as compact a structure as possible before you group them. This
eases the task of sorting them out if you ungroup them again.
Once you have grouped modules by selecting
Group
from the Group menu, the modules behave as a single entity and have a single
control panel. If you select another module, then reselect one module in an
open group, all the modules in the group are selected. Likewise, when you
drag any module in the group, they all move together.
To create a new group or work with an existing group, follow these
steps.
This example illustrates how to select three modules in a map and group
them.
Figure
5-1
shows the original map with all the modules ungrouped. It is a typical map:
it reads two images from disk using two
ReadImg
modules and filters both images. One image is sharpened and the other is
edge-enhanced with a Sobel filter. The resulting images are blended together
and sent to
DisplayImg.
The center three modules,
SobelEdgeImg,
SharpenImg, and
BlendImg, can be collapsed into a single group to simplify the map.
A group usually consists of several modules. Each module can have several
input and output ports and numerous widgets. In the context of a group
module, not all these ports and widgets make sense or are usable.
The Group Editor (see
Figure
5-4) allows you to:
The group control panel has ports, widgets, and a module pop-up menu, just
like the module control panel. It is, however, a different color. The widgets
on the control panel allow you to control the value of the module parameters
directly.
You can reorder the module sequence in the Group Editor by grabbing the
module title bar and dragging it to the desired location. This changes the
sequence in which ports are shown on the group control panel's input and
output port lists.
If you are creating a group or application control panel, you get a
default widget setting. The Control Panel Editor allocates to each parameter
in the new control panel the same widget type and properties as the parameter
had in its module control panel.
For example, the
SobelEdgeImg
module has a slider for its Bias parameter. If you create a group containing
SobelEdgeImg
and promote the Bias parameter to the group control panel, the slider appears
on the group control panel by default.
You can change this default to whatever suits your needs at the group
level.
Selecting a port for the group control panel is called
promoting
the port. In deciding which ports and widgets to promote, you need to
determine how you want to reuse this group and how your users (if any) will
be using the group.
To select a port, click on the port button in the Group Editor.
Ports that are not promoted to the group level are not visible in the
group control panel. The ports still exist, however, and widget-based
parameter input ports retain the value they had when you first created the
group. You can adjust the values of hidden parameters by opening the group,
using
Open
on the Group menu.
Groups have two kinds of required input ports: those that are required at
the module level and hence at the group level also, and those that are
optional at the module level and have been promoted to the group.
Some module input ports must have data on them before the module will
fire. These ports are also required at the group level, if there is no
connection to them within the group, otherwise, the group will not fire. In
the Group Editor, required ports are automatically promoted. They appear in
the Group Editor as selected and you cannot deselect them.
For example,
SharpenImg
and
SobelEdgeImg
in
Figure
5-4
both have required module input ports that also appear as required group
input ports. Neither module will fire unless:
These ports will be promoted to the group level and appear on the input
port menu of the group control panel. The group control panel will not fire
unless both ports have data on them.
Port names are shown on the input and output port lists in the group
control panel and on the parameter widgets, so it is important that each port
have a unique name. However, group modules often contain two modules whose
ports have identical names. For example, there are two
Img In
ports in
Figure
5-4.
Sometimes you may want to rename a port even if the name does not conflict
with another port in the group. The focus of the group and the intent of an
individual module are different, and a new name may make more sense in the
context of the group.
The Group Editor provides an
alias
text slot for each port so you can set up a unique name for it.
To change the name of a port, type a new name in the text type-in slot.
Figure
5-5
shows the Group Editor after both the
Img In
ports have been renamed.
To complete the new group control panel, select these parameters in the
Group Editor:
You can change the parameter names if you wish.
For example, in the context of the group,
Bias
needs some clarification so it can be renamed
Sobel Bias.
You can rename ports and parameters at any stage of the grouping process
by entering the new name in the Group Editor.
Click on
Apply
or
OK
to apply the changes and set up the new control panel.
Some ports may not be required by an individual module, but must be
promoted once the module is part of a group, because there are connections to
other modules in the map outside the group at the time of creating the group.
Suppose you select
ReadLat,
Contour, and
WireFrame
to make a group. The group has one outside connection, a hookup from
GenerateColormap
to
Contour. The
Colormap - - Lattice
input port on
Contour
is not intrinsically a required port, but in the context of the new group, it
becomes required because of its link to
GenerateColormap. Hence, it is automatically promoted to a group-level
port.
This principle also holds true for output ports. If a connection exists
downstream of the group, the port with that connection is automatically
promoted and indicated as selected in the Group Editor.
You cannot promote loop controller capability from the loop controller to
a group module. If you want to link a grouped loop into another loop, you
must include a separate loop controller module in the new loop.
You can create a group control panel in two ways, by default and by
conscious design.
Use the Group Editor to create a default layout.
To do this, click on the
OK
button at the bottom of the Group Editor window after you have selected the
ports and parameters you want. This dismisses the Group Editor, applies the
changes, and updates the Map Editor. In the process, it creates a default
control panel for the group.
This is useful if the group does not have any parameters for which widgets
are required, or if you can use all the default settings and layouts for
selected parameters.
Use the Control Panel Editor, accessible from the Edit menu of the Group
Editor, to lay out the control panel of the new group and customize it (see
Chapter
4,
Editing Control Panels and Functions).
Figure
5-6
shows the control panel for the new group in the Map Editor, along with its
maximized form. It is easily recognizable as a group module because it is a
different color.
If you select the input port access pad of the new group, you see only
those ports you selected in the Group Editor, with the names you chose for
them.
Figure
5-7
shows a group control panel with a drawing area. It uses the collection of
modules and maps from the previous examples, but adds some of the
DisplayImg
module's widgets, including its drawing area, promoted by selecting
Window - - Parameter
in the Group Editor.
Notice the difference in size between this map and the one in
Figure
5-7. A considerable savings has been obtained by combining four of the
original six modules into a single group.
To display the full-scale control panel, click on the
Maximize
button, just as you would an ordinary module.
To open a group again, select
Open
from the Group menu. The original modules reappear with each module outlined
in red.
While a group is opened you can interact with any of the widgets of the
constituent modules to change their parameter settings.
If you have a nested hierarchy of groups, you may open all groups in the
hierarchy. However you can use
Edit
only on a top level group, you cannot edit a group within a group. Therefore
you should have finalised selecting promoted ports before including it
within another group.
Click on the background to deselect the open group. To select one or more
modules in the group hold down the
<Shift>
key and click on each module to toggle selection on and off. To select one
module in the group, deselecting all other modules currently selected, hold
down the
<Alt>
key and click on the module.
To close the group and display the group control panel again, select
Close
from the Group menu.
You can create and destroy connections within the opened group, those
between modules belonging to the group. Use the port menus to create and
destroy a connection as usual. When creating a connection you will see that
compatible ports are highlighted only on modules within the group.
If you use the Disconnect and Reconnect options on these modules, only those
connections between modules within the group are broken with Disconnect and
recreated with Reconnect. Using Disconnect and Reconnect on a closed group
breaks and recreates the connections from the promoted ports of the group,
but not the connections internal to the group.
You cannot create a connection from inside the group to outside. You should
promote the inside port to the group, using
Edit
on the closed group, and then connect selecting from the port menu of the
closed group.
You will see when disconnecting to ports of modules within a group that
the name of the module is preceeded by the name of the group to further
identify the connection.
The control panel of the original group is retained, except that
widgets corresponding to parameters from omitted modules are removed.
Settings for promoted ports and alias names are also
retained. There may be additional required ports that are promoted
from the new modules within the group. Note that it is possible for a
port that was required for the original group to no longer be
so. For example, by adding a module into the group that has a
connection to an originally required port, removes the need for that
port to be promoted to the group. This port will still be marked as
promoted in the Group Editor, but can now be deselected.
You can ungroup a closed or open group by selecting
UnGroup from the Group menu. You are left with the original
collection of separate modules. If the group is closed and only the
group control panel is showing, it opens before it is ungrouped.
When you have created a group with its own control panel, you can run it
as an application. An application is a module or map that runs in a special
IRIS Explorer mode outside the Map Editor. You can engage the application
mode only when you start IRIS Explorer from the command line. You cannot
change an ordinary IRIS Explorer session into an application-mode session.
Application mode operates on ordinary IRIS Explorer maps, which consist of
one or more modules or groups. Usually, a map contains several modules,
collected into one or more groups.
There is no special procedure for creating an application, since an
application is simply a map run in a special mode.
In most applications, you will want a drawing area in order to visualize
the results of the process that the application is performing on the incoming
data.
When you are building an application, special attention should be given to
the values of parameters in the application map.
When a map is run as an application, the parameters in the map will have
whatever values they were set to when the map was saved. This matters
particularly for parameter widgets associated with input and output
filenames.
For example, suppose you are building an image processing application from
a map that contains
ReadImg. While testing the map, you typed the filename
fish.rgb
into
ReadImg
and then saved the map.
When you run the map as an application,
ReadImg
will be given the specific input filename
fish.rgb
and, therefore, will attempt to read in
fish.rgb
each time it starts up. In an image processing application for general use,
this may not be the best behavior. However, for some parameters, setting the
values in the map to default initial values may be the correct thing to do.
When you save a map that will be used as an application, be careful to set
parameters to the start-up values that the application user expects.
You must make sure that any map saved for later use as an application has
at least one open control panel, that is, maximized to its full size;
otherwise, nothing will be visible when you run the application. In
application mode, the mini control panels are not visible and there is no way
to maximize a group control panel. You can save a map with more than one
control panel maximized if you wish.
To save the map, select
Save Selected
from the File menu on the Module Librarian. Save each map with a name and the
suffix
.map.
You can run an application using the command-app.
To open and use a standard application, at the shell prompt, type:
When you run an application, only the application control panel is
displayed on the screen. The IRIS Explorer window, the Map Editor window, and
the Librarian are not displayed.
Applications generally have a main window, which is a control panel that
must be visible for the application to work properly. The Motif window
Quit
command is issued to a window when the user double-clicks in the upper left
hand corner of the Motif window frame.
When IRIS Explorer is running normally (not in application mode), the
double-click merely dismisses maximized control panels. The user can still
access the corresponding mini control panel in the Map Editor and can
re-maximize the control panel from there.
In application mode, the default behavior is the same, that is, double
clicking dismisses maximized control panels. This is fine for secondary
windows that may have been exposed under the control of the application
itself.
However, if you dismiss an application main window in this manner, you
cause the application to cease operating. This is because there is no visible
Map Editor and thus no way for a user to recover the maximized control panel.
It is a good idea to add
Quit
to the menu bar on the main group control panel in your application map,
otherwise, the only way to quit an application is through the Motif window
menu.
You can also use the script command:
to change the default behavior of the main window so that double-clicking
on the control panel for
my-module
quits the application. The user will be asked to confirm the quit operation.
In application mode, the Map Editor is not visible and so the user does
not observe the usual signals that a map is executing, such as yellow
highlighting and the
Busy
cursor.
Instead, IRIS Explorer displays a
Busy
cursor over all control panels when any module in an application is
executing.
If you turn execution highlighting off, you disable the display of the
Busy
indicator.
To run an application so you can check its development and do debugging
tasks, at the shell prompt, type:
When you run IRIS Explorer with this command, the application is
displayed, along with the IRIS Explorer window. The IRIS Explorer window
gives you access to the Map Editor and the Module Librarian if you require
it.
Module Groups
Types of Groups
Selecting Modules
Creating a Group
The name of the new group module defaults to
Group. You can rename it anything you like in the Group Editor. Group
control panels are colored differently from individual modules.
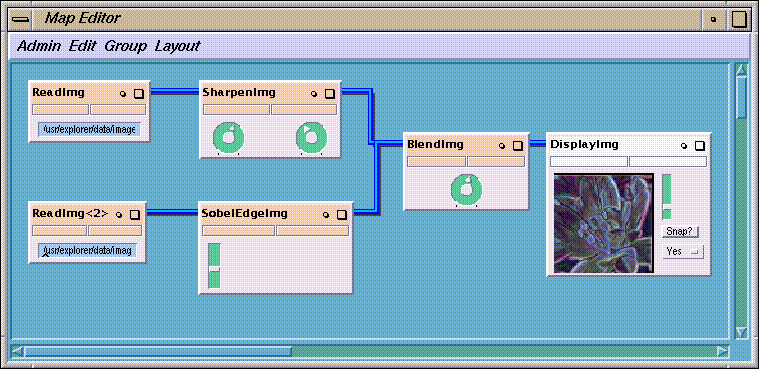
Figure 5-1 An Image Processing Map
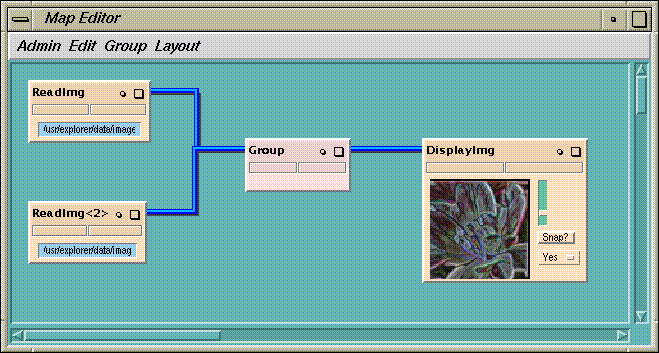
Figure 5-2 The Closed Group
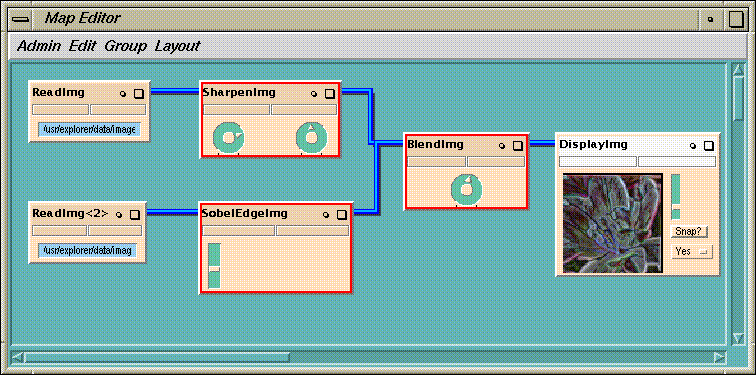
Figure 5-3 The Open Group
Editing a Group
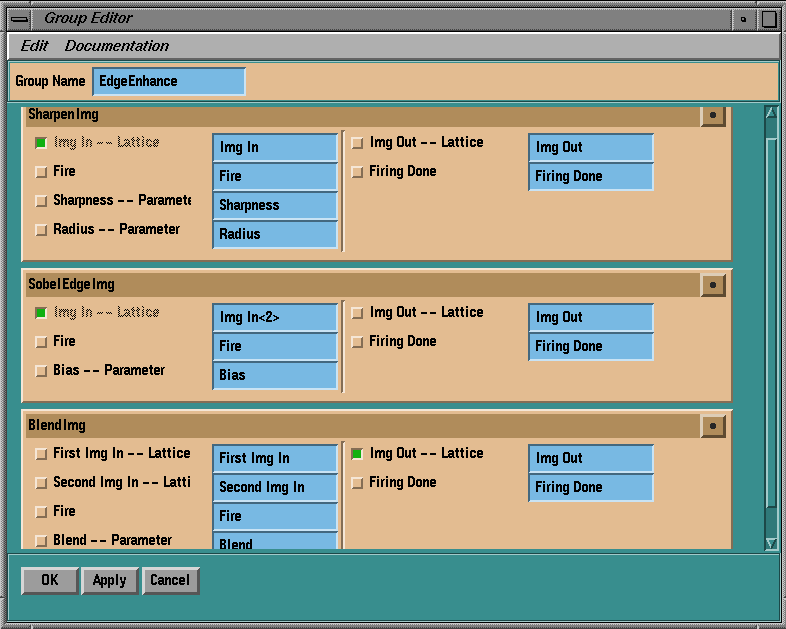
Figure 5-4 The Group Editor
The Group Control Panel
Promoting Ports
Required Input Ports
Renaming Ports
Selecting Parameters
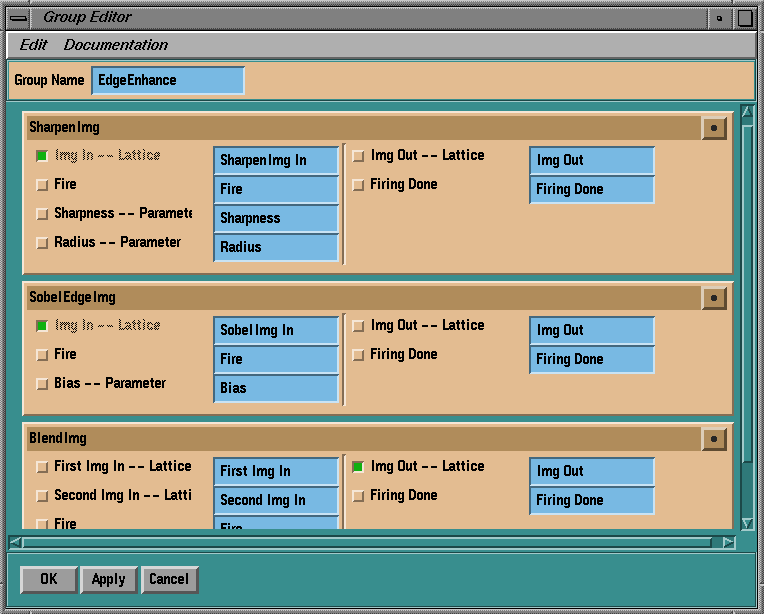
Figure 5-5 Renaming a Port
Grouping Optional Ports
Grouping Modules in a Loop
Creating a Group Control Panel
The Default Control Panel
The Designer Control Panel
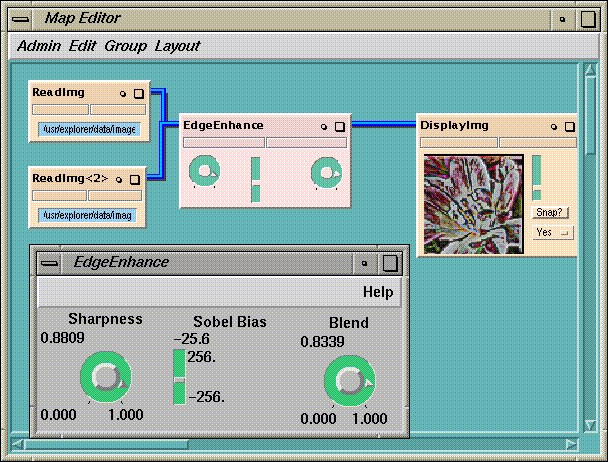
Figure 5-6 The Group Control Panel
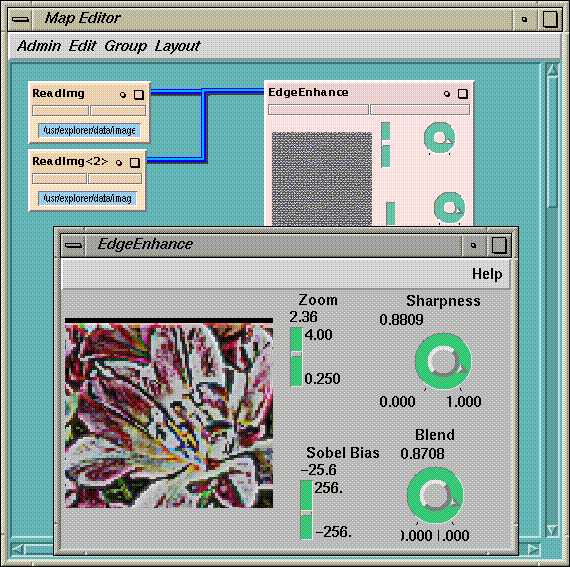
Figure 5-7 The New Group Control Panel
Opening a Group
Modifying Connections
Redefining a Group
The modules within a group can be reselected, retaining the attributes
of the edited group, using the Regroup option on the Group
menu. Select modules from the open group, leaving as unselected those
to be omitted from the redefined group; in addition, select modules
not currently within a group to be added to the group. Then select
Regroup.
Defining an Application
Creating an Application
Setting Parameters in an Application
Saving the Application
Running an Application
explorer -app applicationname.map
Quitting an Application
(set-app-main-win my-module)
Application Busy Indicators
Debugging an Application
explorer -map applicationname.map
Last modified: Mon Oct 13 16:34:30 1997
[ Documentation Home ]